Instructions for Completing a Data Import
Step 1. Add or Update Existing Records
Step 2. Upload and Map CSV File
Updating Records through Data Import
Data Import
You can manually upload donation records into Double the Donation Matching by using a CSV file. This is useful for importing offline or historical donation records so that automated matching gift emails can be sent to those donors.
The data import feature is now a two-step process where you can import the CSV File and then select which email streams you'd like to send matching gift emails to. You also view an import history that includes:
- Total number of donation records Imported
- Total number of donation records that failed to be imported, and
- Total number of donation records that are duplicates and won't be imported.
Instructions for Completing a Data Import
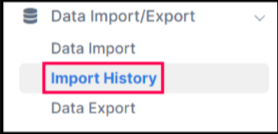
To begin, navigate to your account to Data Import/Export --> Data Import.

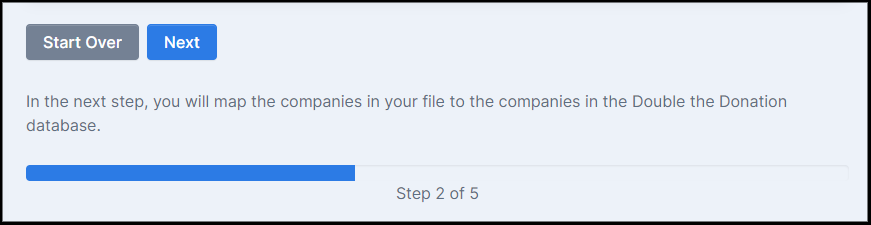
When navigating through the import wizard, you have the ability to: track your progress via a progress bar, proceed to the next step using the blue button, start over using the gray button (at some steps), and preview the next step using the text above the progress bar.
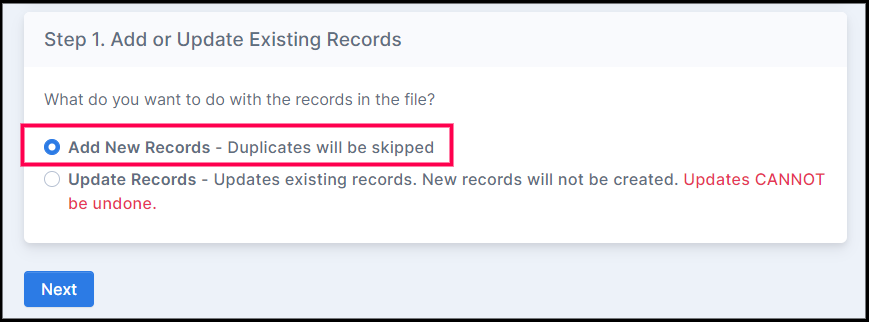
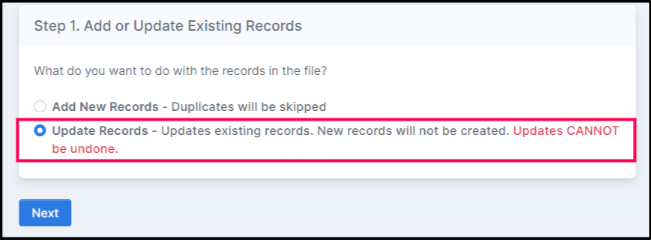
Step 1: Add or Update Existing Records
In this initial step, select what you want to do with the records in the file:
-
Add New Records: Duplicates will be skipped.
-
Update Records: Updates existing records. New records will not be created. Updates CANNOT be undone.
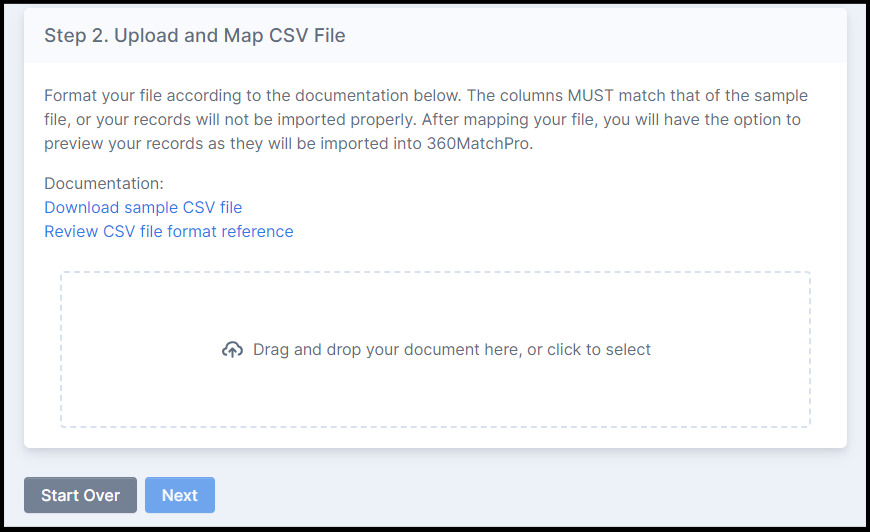
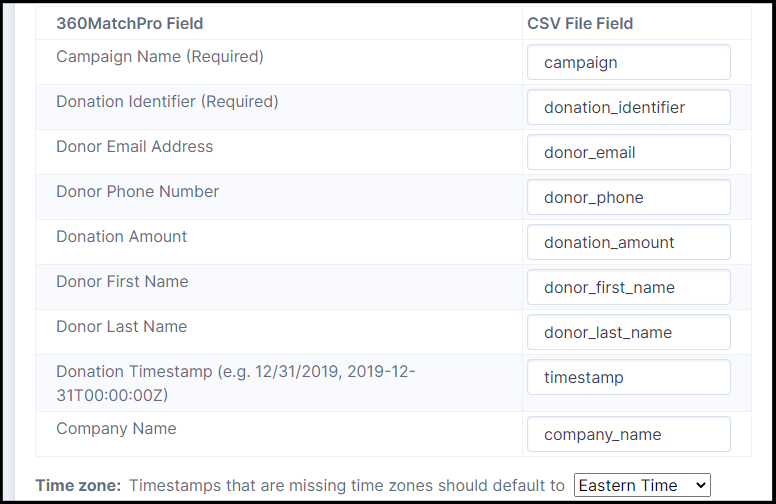
Step 2: Upload and Map CSV File
Download sample CSV file
Important: To help ensure your columns and data are mapped correctly, please download and use our sample CSV file here or make sure that the columns have the same format. This will help avoid errors when importing your donation records.
Upload file
Drag and drop your CSV file, or click the upload box to select your file from your computer.
Instructions for the CSV File that you want to import include following the same formatting as the sample CSV File within your account. The columns in your CSV file MUST match the formatting of the sample CSV file provided in your account. You must include the column titles exactly like the sample file.
You can view this sample CSV file in a Google sheet or Excel file to see the correct columns that need to be included.
The columns that need to be included in the CSV file include:
-
Campaign
-
Identifier
-
Amount
-
Email
-
Phone Number
-
First Name
-
Last Name
-
Company Name
-
Timestamp (Please note: The date needs to be formatted as MM/DD/YYYY or YYYY-MM-DD. See "FAQs" below for more information.)
You must include the column titles just like the sample CSV file. We recommend including a value for each field, but the only required fields are Campaign and Identifier. The other fields can be left blank for a donation record if you do not have the information.
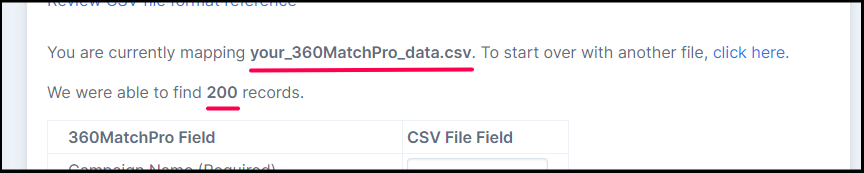
Confirm file
Once your file has been uploaded, you can confirm that it is the right file by checking the name of the file and the number of records found:
Map fields
If you used the exact column headers from the sample CSV file, Double the Donation Matching will automatically map the fields for you. If headers don't match exactly, you must manually map your fields using the table presented.
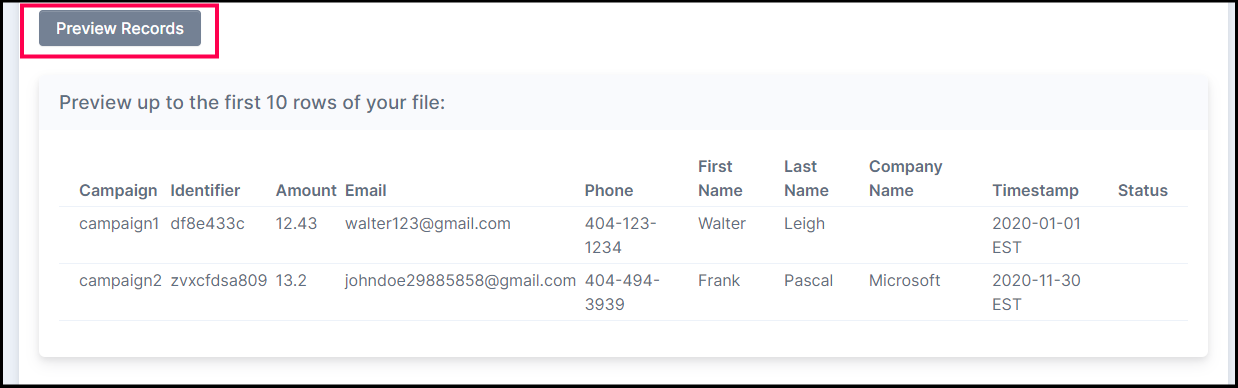
Preview records
After mapping, select "Preview Records" to review the first 1-10 rows. Correct any improperly mapped fields before moving on.
Step 3: Map Companies
After mapping, select "Preview Records" to review the first 1-10 rows. Correct any improperly mapped fields before moving on.
You can keep or not keep the company name for each entry. We recommend referring to the score to guide you, keeping any company names equal to or above 15. Please review all suggestions, as exceptions happen.
While you can individually check and uncheck each entry, you can use the "Threshold" text field to check all entries meeting or exceeding a specific score or use "Uncheck All" to reset.
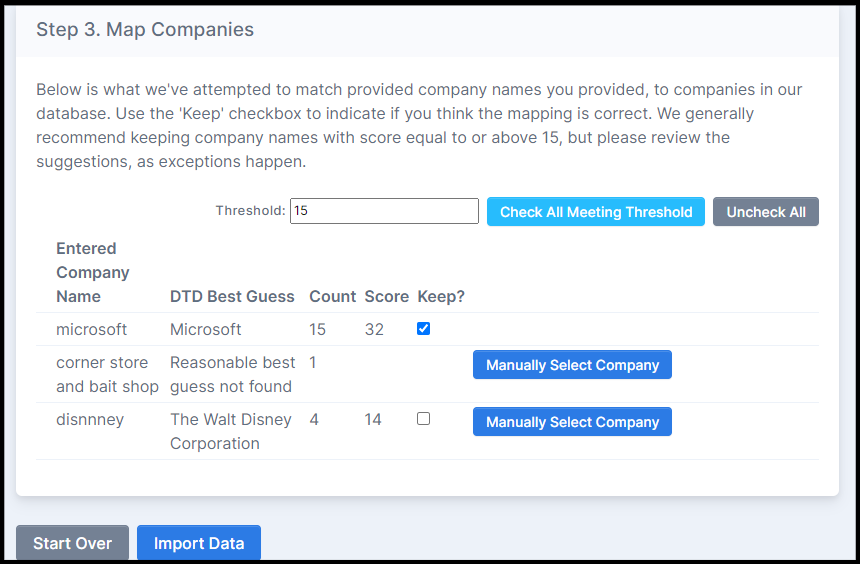
Manually selecting a company
If the suggested company is incorrect or "Reasonable best guess not found" is displayed, select the "Manually Select Company" button to use a company search tool. You can use the "Clear Manual Selection" link to reset your search.

Use the search tool to select the correct company.

If you selected the wrong company, use the "Clear Manual Selection" hyperlink to reset your search.

To learn more about Mapping Companies, see this article.
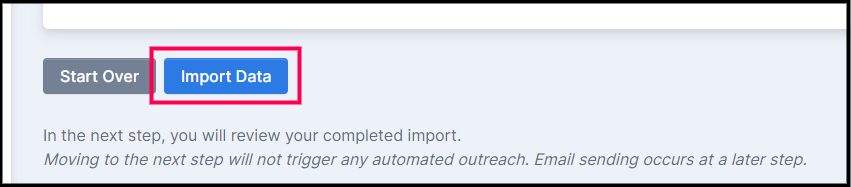
Import data
Once your mapping is complete, select "Import Data."
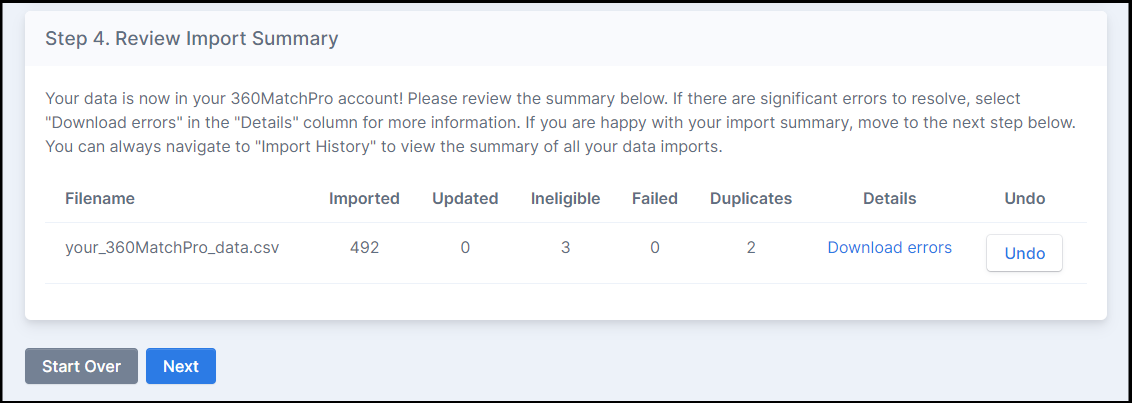
Step 4: Review Import Summary
Review the summary, which includes the number of records: Imported, Updated, Ineligible, Failed, and Duplicates.
-
If there are significant errors, select "Download errors" in the "Details" column for more information.
-
You can always navigate to "Import History" to view the summary of all your data imports.
Step 5: Send Emails
This final step allows you to trigger automated outreach to donors about matching gifts.
-
No emails will be sent until you select the "Send Email" buttons.
-
Selecting "Send Email" enrolls imported donors into your existing configured automated outreach streams.
-
Emails will follow your account's configuration settings, such as sending limits.

To learn more about Triggering Outreach, see this article.
To learn more about what happens after import, see this article.
- Match Eligible
- Identification In Progress
Undoing a CSV Import
You can undo a CSV import by clicking the red "Undo" button in the Import History.

You can only undo a CSV Import BEFORE you send out automated matching gift emails. If you send out automated matching gift emails, you can't do so after completing that process.
Updating Records through Data Import
You can update existing records in Double the Donation Matching through the Data Import feature.
Navigate to Data Import/Export --> Data Import --> Select "Update Records."
Follow the wizard through the same steps as the Add New Records flow illustrated above.
Notes for Updating Records
-
Blank Fields: If a cell in your updated CSV file is blank but the corresponding record in Double the Donation Matching has a value, the blank cell will not override the current value.
-
"Closed" Status: Updates to or from the "Closed" status can significantly impact donor communications. Double-check any records before updating their "Closed" status.
-
Best Practice: We highly recommend downloading the records you intend to update directly from Double the Donation Matching, modifying them, and then going through the update import process. This reduces errors compared to building the update file from scratch. Learn more about CSV data export in this article.
Import History
You can view your organization's import history by navigating to Data Import/Export ---> Import History. The history includes the total number of records imported, failed, and duplicates.
To import another CSV file, click on "Import Another CSV File."
Error Reporting
If errors occurred during your CSV upload, you can download an error report.
-
Navigate to Import History.
-
Locate the row of your import.
-
Select the "Download errors" link in the "Details" column.
The downloaded file is a replica of your uploaded file with an additional column, "error-message," appended to the right.

When you select the "Download errors" link, a CSV file will download. This file is a replica of the file you uploaded, along with an additional column, called "error-message," appended as the last column to the right. The possible values in that column are:
- duplicate - The donation identifier already exists in Double the Donation Matching. This record will not be imported. [Only applicable if you're uploading a new file, not updating records.]
- not found - The donation identifier does not exist in Double the Donation Matching. This record will not be imported. [Only applicable if you're updating records, not uploading a new file.]
- invalid status - Either of the following cases is true. The record will not be updated with the new status. [Only applicable if you're updating records, not uploading a new file.]
- You are trying to change a status to a previous one in the timeline. Status can only advance, not go backward. For example, a donor who has already submitted their gift cannot be marked as awaiting donor action. Reference this article for more about donor statuses.
- You are trying to change a status from or to "closed." This is not allowed via CSV upload.
Note that some error messages will only appear when you are uploading a new CSV file, while others will only appear if you're using the CSV upload feature to update records that are already in Double the Donation Matching.
Historical records imported through Data Import that are already over a year old at the time of upload will not be sent matching gift emails. Please note that this is part of the import criteria within Double the Donation.
Example
- Donation record timestamp: 1/2/2025
- CSV file uploaded: 1/4/2026
Because more than one year has passed between the donation date and the upload date, matching gift emails will not be sent for that donation record. When you hover over the email icon for that record, you’ll see the message: Donation made over a year ago
FAQs:
Q: Why is my CSV file failing to import?
A: One reason your CSV file may fail to import is if you are missing a column. The following columns must be included in the CSV file:
- Campaign
- Identifier
- Amount
- First Name
- Last Name
- Timestamp
If your file still fails to upload, please reach out to support@doublethedonation.com to find a solution.
Q: What happens if I upload timestamps using an incorrect format?
A: If your timestamp is not formatted the same as the timestamp in the sample file, your file will still be imported (as long as there are no other issues with the file). The following will also occur:
- All incorrectly formatted timestamps will be changed to the date and time you uploaded your file.
- All rows with incorrectly formatted timestamps will be marked with errors in your error download file.
If you see this error, it's highly recommended to undo the import, fix the timestamp format, and reupload to ensure record accuracy.