Step-by-Step: Integrate Double the Donation Matching into AdvancementRM
Step-by-Step: Sync Matching Gift Data from Double the Donation Matching to AdvancementRM
Phase 1: Add Double the Donation’s custom field to AdvancementRM’s Match Potential object.
Phase 2: Activate the data sync within the Double the Donation dashboard.
AdvancementRM - Double the Donation Matching FAQs
Double the Donation helps nonprofits and schools grow revenue across workplace giving programs, including matching gifts, volunteer incentives, payroll giving, and corporate sponsorship opportunities. Our workplace giving automation platform identifies eligible opportunities and drives more submissions to completion.
You’ll need a Double the Donation account to activate this integration. Not a Double the Donation client? Schedule a demo at https://doublethedonation.com/get-a-demo/
To use Double the Donation Matching with AdvancementRM, simply integrate your matching module account with your Salesforce instance by following the steps below!
Step-by-Step: Integrate Double the Donation Matching into AdvancementRM
Step 1 — Install the Double the Donation Matching App
-
Navigate to the Double the Donation Matching App on the Salesforce AppExchange.
-
Select Get It Now.
-
Complete the installation wizard.
Step 2 — Log In to Double the Donation Matching
Go to https://doublethedonation.com/members/ and log in using your organization’s credentials.
Step 3 — Activate the AdvancementRM Integration
-
Navigate to Integrations → Browse.
-
Search for AdvancementRM in the Partner Directory.
-
Select Activate Integration.
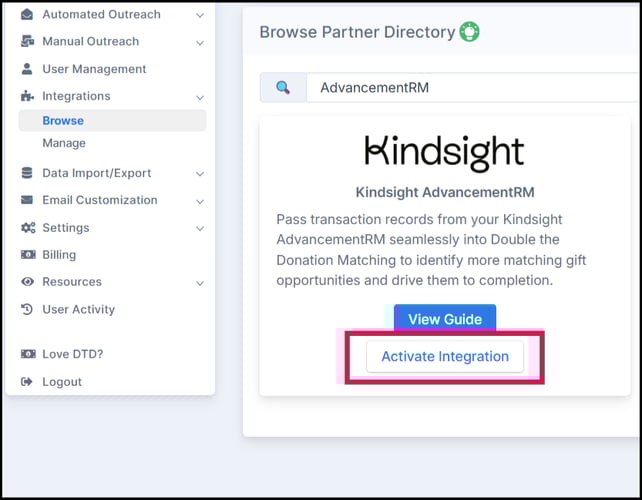
Click Sign in with Salesforce.


Step 4 — Grant Salesforce Access
Enter Salesforce admin credentials and click Allow to grant Double the Donation access to your Salesforce data.
Step 5 — [Optional] Apply the AdvancementRM Data Model to access a clean data mapping experience
Once Salesforce access is granted:
-
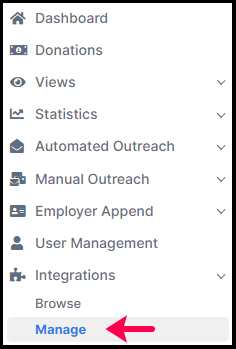
Navigate to Integrations → Manage within Double the Donation Matching.
-
Locate your Salesforce integration.
-
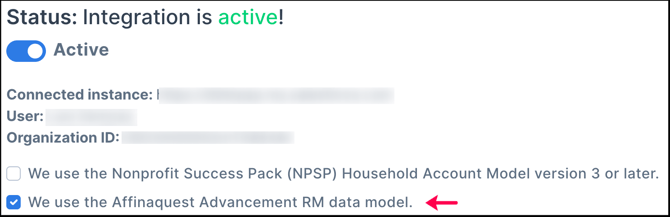
Check “We use the AdvancementRM Advancement RM Model.”
-
Click Save.
-
If you'd like to revert to the default mappings, select the option to "reset mapping".

Integration Status
-
Mapping, inclusions, and exclusions are automatically prefilled
-
You can customize mappings or select Reset Mapping to revert to defaults
-
The integration status shows Active
Step-by-Step: Sync Matching Gift Data from Double the Donation Matching to AdvancementRM
Phase 1: Add Double the Donation’s custom field to AdvancementRM’s Match Potential object.
Step 1 — Open Object Manager
In Salesforce:
-
Navigate to Object Manager.
-
Select the Match Potential object.

Step 2 — Create a New Field
-
Select Fields & Relationships.
-
Click New.

-
Choose Lookup Relationship.

-
Select Double the Donation then Next

Step 3 — Configure the Lookup Field
.png?width=670&height=197&name=Screenshot%2024-03-2026%20at%2016.29%20(1).png)
Set the field details exactly as shown:
| Field Attribute | Required Value |
| Field Label | Double the Donation Company |
| Field Name | doublethedonation_company |
| API Name | doublethedonation_company_c |
| Description | Stores the employer name or company associated with a potential matching gift, as identified by Double the Donation (DTD). This field helps link the Matching Gift Potential record to the donor’s employer for matching gift eligibility and processing. |
| Help Text | The donor’s employer identified by Double the Donation |
Step 4 — Set Field-Level Security
-
Grant Read access across permission sets
-
Required access for:
-
AQ Generic Permissions Set
-
AQ Separate Utilities
-

Step 5 — Add Field to Page Layouts
-
Check Add to Page Layouts.
-
Click Next and Save.

Phase 2: Activate the data sync within the Double the Donation dashboard.
Step 6 — Enable Promise Creation
In Double the Donation Matching:
-
Navigate to Settings → Promise Creation.
-
Configure business logic for Promised and Matched amounts.
Step 7 — Configure AdvancementRM Sync Settings
-
Go to Integrations → Manage → AdvancementRM
-
Check both options:
-
Create a Matching Gift record in Salesforce
-
Append employer information to Double the Donation’s custom field in AdvancementRM
-

Result
-
Matching gift employer data appears in the Match Potential object
-
Existing company records may auto-populate under Match Account
Q: I don't have a Double the Donation Matching account. How do I get one?
A: Visit the Double the Donation demo request page to schedule a demo. Mention that you use AdvancementRM in your demo request form.
Q: I want to configure exclusions, pull matching gift data back into Salesforce, and do more! How do I manage advanced customization settings?
A: Visit our integration guide for Salesforce: https://support.doublethedonation.com/knowledge/double-the-donation-salesforce-integration-guide
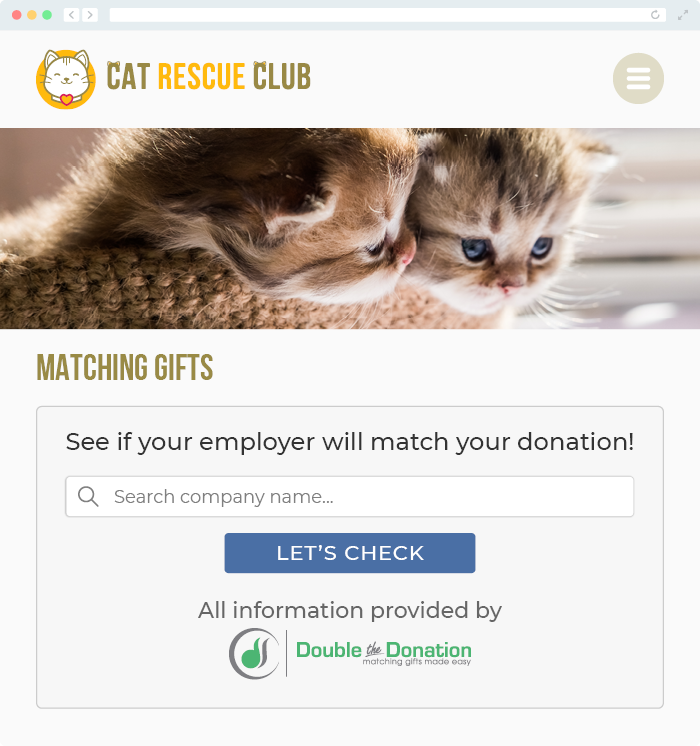
Q: Where else can I embed Double the Donation's plugin?
A: We recommend creating a dedicated matching gift page on your website. This page will help all website visitors, not just those on your donation form, understand matching gift programs and easily find their company’s matching gift guidelines and forms.
To embed the matching gift search tool, locate your embed code from your matching module. Full instructions are available here.
Q: Where can I learn more about the Double the Donation Matching and Kindsight AdvancementRM integration?
A: Navigate to our partner landing page to learn how Double the Donation Matching and Kindsight AdvancementRM can increase your matching gift revenue!
Q: What types of workplace giving programs does Double the Donation support?
A: Yes. Double the Donation helps nonprofits and schools maximize workplace giving by supporting a range of employer-sponsored programs, including:
- Matching gifts
- Volunteer grants and paid volunteer time off (VTO)
- Payroll giving
- Corporate sponsorship opportunities
To learn more:
- Current clients can visit our Knowledge Base or connect directly with our Support team to explore how to make the most of our full suite of products.
- To see how our partnerships and integrations help organizations unlock more workplace giving, check out our workplace giving integrations page.