Nonprofit Cloud Users can follow this link to read instructions for establishing their connection.
Step-by-Step: Activating the Integration between Double the Donation Matching and Salesforce
Step-by-Step: Mapping Fields between Double the Donation Matching and Salesforce
Field Mapping: Nonprofit Success Pack
Field Mapping: Custom Data Mapping
Step-by-Step: Sync Matching Gift Data from Double the Donation Matching to Salesforce
Sync Matching Gift Data: Opportunity Object and Contact Object
Sync Matching Gift Data: Other Standard Objects or Custom Objects
Step-by-Step: Create Matching Gift Opportunity Records in Your Salesforce Account
Salesforce - Troubleshooting Common Issues
Salesforce - Double the Donation FAQs
Double the Donation helps nonprofits and schools grow revenue across workplace giving programs, including matching gifts, volunteer incentives, payroll giving, and corporate sponsorship opportunities. Our workplace giving automation platform identifies eligible opportunities and drives more submissions to completion.
You’ll need a Double the Donation account to activate this integration. Not a Double the Donation client? Schedule a demo at https://doublethedonation.com/get-a-demo/
What do these steps do? By activating the integration between Double the Donation Matching and Salesforce, you enable data to flow from Salesforce into the matching module. Once gifts are flowing from Salesforce to Double the Donation Matching, the matching module can go to work identifying corporate matching gift opportunities and driving those matching gift opportunities to completion to bring in more fundraising revenue for your organization.
Step-by-Step: Activating the Integration between Double the Donation Matching and Salesforce
Ready to raise more with the Salesforce Nonprofit Success Pack + Double the Donation integration? Activate the integration by following this video walkthrough.
Step 1 — Install the Salesforce App
Navigate to the Double the Donation Matching App on the Salesforce AppExchange, linked here. Select Get it Now and follow the installation wizard. When prompted, select Install for Admins Only.
Step 2 — Authorize the Connection
Log in to your Double the Donation account at https://doublethedonation.com/members/. Navigate to Integrations → Browse and search for Salesforce. Select Activate Integration and then click Sign in with Salesforce.

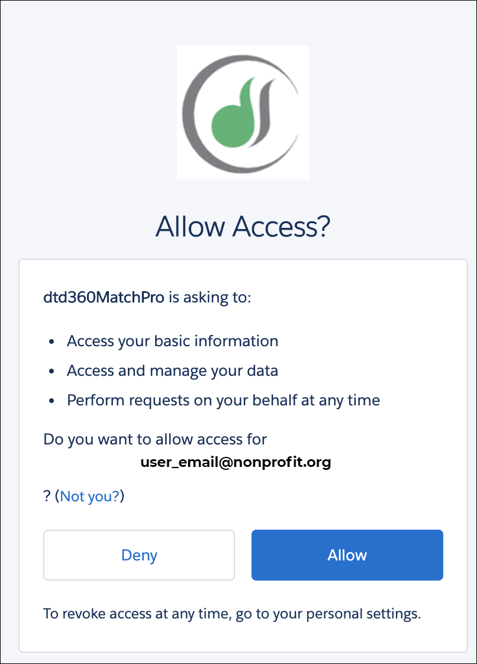
Step 3 — Grant Platform Access
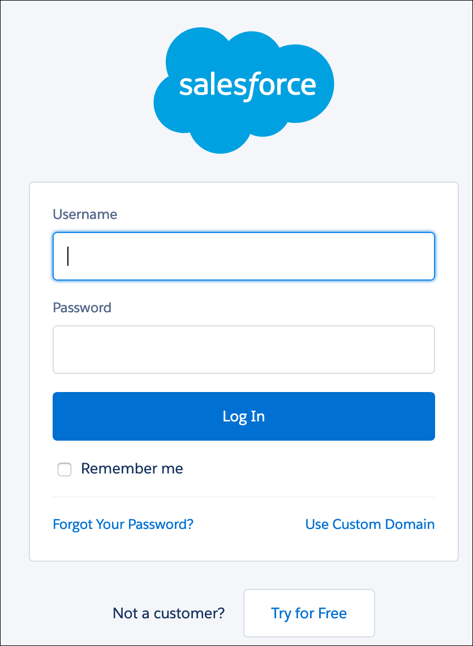
You will be redirected to Salesforce; enter your user credentials to log in. Review the requested permissions and click Allow to enable the data flow.
Step-by-Step: Mapping Fields between Double the Donation Matching and Salesforce
What do these steps do? Every Salesforce instance is a little bit different. By following these steps to complete your field mapping, you're telling Double the Donation Matching how your unique organization stores data in Salesforce. That way, Double the Donation knows where to find the data it needs to start the gift-matching process.
If you use Salesforce Nonprofit Cloud, follow this guide to set up your connection.
Field Mapping: Nonprofit Success Pack
Follow these instructions if your organization uses the Nonprofit Success Pack Household Account Model, and you do not want to customize your data flow. If your organization plans to add custom inclusions and exclusions, follow the setup steps for Custom Data Mapping below.
Option A: Standard NPSP Mapping
If your organization uses the Nonprofit Success Pack Household Account Model without custom field changes:
-
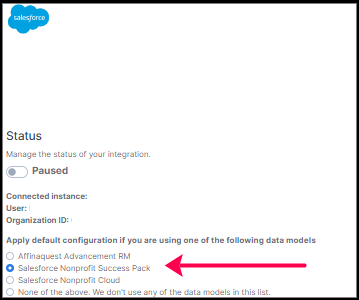
Navigate to Salesforce integration settings in Double the Donation.
-
Locate Apply default configuration if you are using one of the following data models.
-
Select Salesforce Nonprofit Success Pack.
-
Your integration is complete, and donations will sync every 2 hours.
If you would like to edit any of the data mapping, you can do so under the field mapping section below.
Q: What does it mean if the NPSP Household Account Model checkbox is disabled in my account? I thought I was using the NPSP Household Account Model.
A: There could be a few reasons this checkbox is disabled! Double the Donation Matching looks for a certain set of standard fields in your Salesforce instance to determine if you have NPSP installed. If these fields are not present, Double the Donation concludes that NPSP is not installed. If your organization has installed NPSP but has an old version (before version 3) without the standard fields, or if your organization has customized any of these custom fields, Double the Donation Matching will not see the standard fields and therefore not allow you to use the NPSP mapping. Double the Donation will present an error message indicating which situation applies to your account. In all cases, please proceed to custom mapping below to continue setting up your integration.
Field Mapping: Custom Data Mapping
Follow these instructions if your organization does not use NPSP or the Nonprofit Cloud (NPC) Fundraising Data Model.
If you do not use NPSP or have a unique data schema:
-
Log in to your Double the Donation Matching account.
-
Navigate to Integrations → Manage → Salesforce.
-
Under “Apply default configuration if you are using one of the following data models,” select: None of the Above. We don’t use any of the data models in this list.
- Locate the Field Mapping section that appears.
-
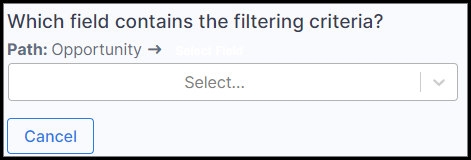
Select the Salesforce object used to store donation data (e.g., Opportunity).
-
In this example, the organization uses the opportunity object to store their donation data.
-
-
You have two options for mapping Salesforce fields to Double the Donation Matching fields.
Option A: Automatic Mapping
-
Click “Let Double the Donation try!”
What this does:
-
The matching module attempts to map your fields automatically.
-
Existing mappings are not overwritten or saved unless you choose to keep them.
Option B: Manual Mapping (Recommended for Custom Setups)
-
Click Edit to map fields individually or refine the automatic mapping.

-
For each field, create a field path to the correct Salesforce data point.
-
When all mappings are complete, click Save Mappings.
Example Mapping
-
Start with the Opportunity object.
-
Navigate to the related Campaign object.
-
Select the Campaign Name field.

-

Once you create the mapping, you will be able to save it.
Step-by-Step: Configuring Exclusions and Inclusions with your Double the Donation Matching and Salesforce Data Flow
What Do Exclusions and Inclusions Do?
Salesforce data structures often include edge cases that don’t follow your organization’s standard rules. Exclusions and Inclusions allow you to refine how donation records are imported into Double the Donation Matching, ensuring:
-
Clean, accurate data transfer
-
Correct donor communications
-
Improved data hygiene
How the Logic Works
-
Exclusions: Records that meet any exclusion criteria will not be imported.
-
Inclusions: Records that meet any inclusion criteria will always be imported.
This logic ensures that exceptions are handled consistently without manual intervention.
Step 1 — Access Salesforce Integration Settings
-
Log in to your Double the Donation Matching account.
-
Navigate to Integrations → Manage → Salesforce.
-
Select Add Exclusion.

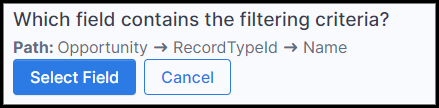
Step 2 — Select the Field Path
-
Identify the Salesforce field that will serve as the basis of the exclusion.
-
Create a field path by selecting related objects until you reach a primitive data type (e.g., text, number, boolean).
Step 3 — Confirm the Field
-
Click Select Field to confirm your chosen data path.
Step 4 — Define Exclusion Values
-
Enter the value(s) that should trigger exclusion.
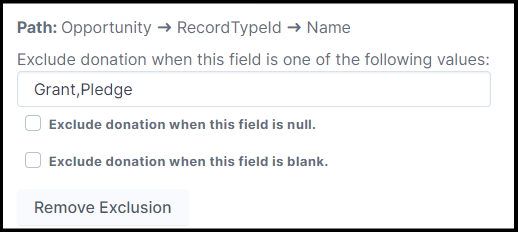
Example:
If the selected field is Record Type, and the values entered are:
-
Grant -
Pledge
Then Double the Donation Matching will not import any donation records with those record types.
Adding Inclusions
-
Inclusions are added using the same process as Exclusions.
-
Instead of blocking records, inclusion rules guarantee that qualifying records are imported.
Step-by-Step: Sync Matching Gift Data from Double the Donation Matching to Salesforce
What do these steps do? The primary goal of Double the Donation Matching is to raise your organization more money in corporate matching gifts. But Double the Donation collects some interesting, useful data along the way! By completing these steps, you allow Double the Donation to report back within your Salesforce instance so you can view matching gift company information without even logging into the matching module. This functionality is only available for Version 1.1.0 and above.
Sync Matching Gift Data: Opportunity Object and Contact Object
Follow these instructions if your organization stores donation data in the Opportunity Object and/or the Contact Object.
Step 1 — Enable Sync Options in Double the Donation
-
Log in to Double the Donation Matching.
-
Navigate to Integrations → Manage → Salesforce.
-
Under the Sync Options heading, check the box to enable syncing matching gift data.

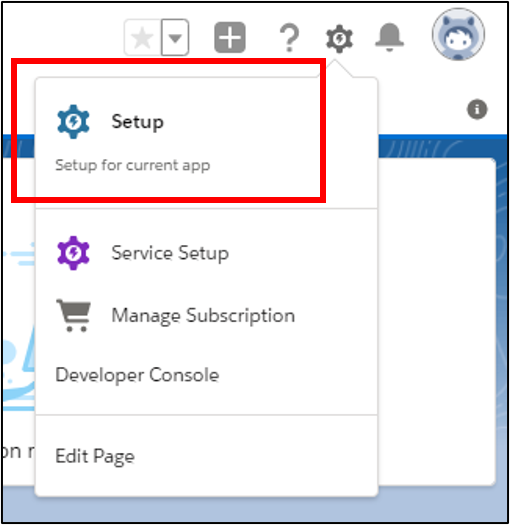
Step 2 — Open Salesforce Setup
-
Log in to your Salesforce org.
-
Select Setup from the upper-right corner of the screen.
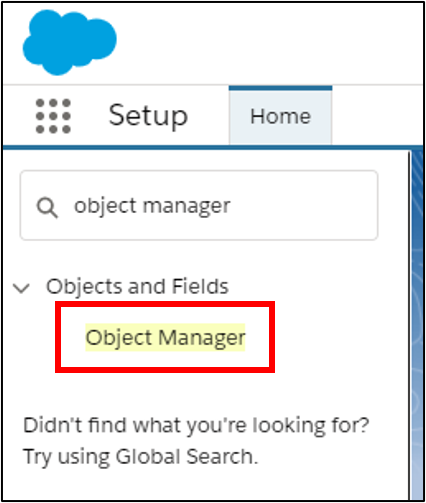
Step 3 — Access the Object Manager
-
Use the Quick Find search bar in the upper-left corner.
-
Search for and select Object Manager.
Step 4 — Configure the Opportunity Object
-
From Object Manager, select Opportunity.

-
Select Page Layouts from the left-hand menu.
-
Click the name of the Opportunity Page Layout you actively use.

Note: If multiple layouts exist, choose the most recently modified or most commonly used layout.
Step 5 — Add the Matching Gift Company Field
-
Locate the Company Selected for Matching Gifts field in the drag-and-drop menu.
-
Drag and drop the field onto the layout.
-
We recommend placing it in the Opportunity Information section near the top of the page.
-
Click Save.
Step 6 — Repeat for the Contact Object
-
Return to Object Manager.

-
Select Contact.
-
Repeat Steps 4–5, adding the Company Selected for Matching Gifts field to the Contact layout.

-
Click Save.

Step 7 — Confirm the Field Is Visible
-
Open an Opportunity or Contact record.
-
Select the Details tab.

-
Confirm that the Company Selected for Matching Gifts field appears on the record.

Important:
The field will remain blank until Double the Donation identifies a matching gift company.
Once populated, the company name appears as blue hyperlinked text.
Clicking the link opens simplified matching gift program details directly within Salesforce.
Sync Matching Gift Data: Other Standard Objects or Custom Objects
Follow these instructions if your organization does not store donation data in the Opportunity or Contact Object, whether you use another default Salesforce Object or a custom Object.
Step 1 — Open the Object Manager
-
Navigate to Setup → Object Manager.
-
Select the object your organization uses to store donation data.
Step 2 — Create a New Lookup Relationship
-
Select Fields & Relationships from the left-hand menu.

-
Click New.

-
Choose Lookup Relationship as the field type.
-
Click Next.

Step 3 — Link to Double the Donation Company
-
In Step 2: Choose the related object, select Double the Donation Company.
-
Click Next.

Step 4 — Configure the Field Name
-
Click into the Field Name field.
-
Allow Salesforce to auto-populate the name as: Double_the_Donation_Company
-
Accept this default value.
-
Accept all remaining default options.
-
Click Next.

Step 5 — Complete the Setup Wizard
-
Continue through the remaining steps in the wizard.
-
Accept all default settings.
-
Click Save to create the relationship.
Step 6 — Add the Field to the Page Layout
-
Select Page Layouts from the object’s left-hand menu.

-
Choose the appropriate layout your organization actively uses.
-
Use the Quick Find search bar within the layout editor.
-
Confirm that the Double the Donation Company field is available and placed on the layout.

-
Save the layout.
Step-by-Step: Create Matching Gift Opportunities in Salesforce
Salesforce users leveraging the NPSP Household Account Model can create matching gift opportunity records in their Salesforce account by following the steps below.
Step 1 — Enable Matching Gift Opportunity Creation
-
Under Sync Options, select the checkbox to:
-
Create a matching gift opportunity record in Salesforce
-
Follow the business logic configured in Promise Creation settings
-

Step 2 — Enable Promise Creation
-
In your matching module, navigate to:
-
Settings → Promise Creation
-
-
Ensure the setting is Enabled.

Congratulations! We will now create a matching gift object for this gift within Salesforce.
Salesforce - Troubleshooting Common Issues
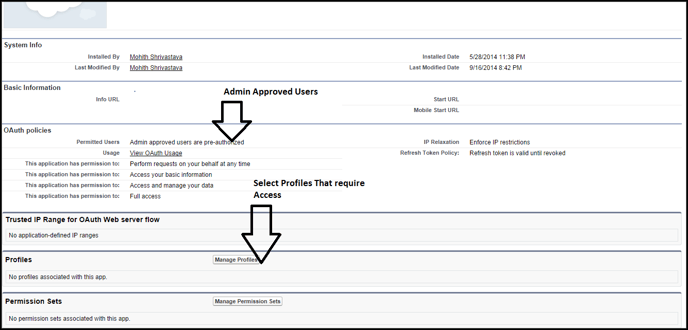
Problem: “Access Denied” Error During Salesforce Connection
Issue: When attempting to connect Salesforce within Double the Donation Matching, you receive an “Access denied” error.
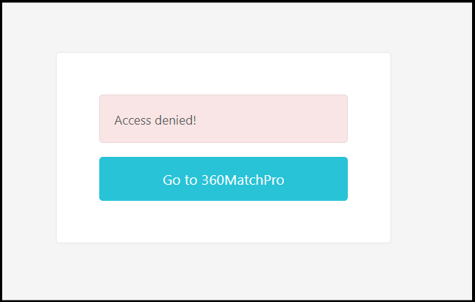
Cause: The Salesforce user is not configured as an admin-approved user for the connected app.
Solution
-
In Salesforce, navigate to the connected app configuration.
-
Select Manage Profiles.
-
Add System Administrators to Admin Approved Users.
Problem: Salesforce Integration Disconnects After Staff Changes
Issue: The integration disconnects when the user who originally set it up leaves the organization.

Cause: The integration is tied to an individual user account.
Solution
-
Use a general user profile (e.g.,
donations@yourorg.org) to reconnect. -
Reset the integration:
-
Navigate to Integrations → Manage → Remove Integration
-
-
Reconnect Salesforce following the instructions here.
Salesforce - Double the Donation FAQs
Q: I don't have a Double the Donation account. How do I get one?
A: Visit the Double the Donation demo request page to schedule a demo. Mention that you use Salesforce in your demon request form.
Q: How are the fields mapped for the NPSP integration?
A: We map to the Household Account Model fields for NPSP (see below). If you use NPSP but have customized your fields, you can follow the custom mapping integration to connect your Salesforce CRM.

Q: Are there any default inclusions or exclusions when using the NPSP integration?
A: Yes! We have a number of default inclusions and exclusions for this integration, that are outlined below.
Inclusions:

Exclusions:

Q: I have checked the box to sync Double the Donation Matching company data back into my Salesforce instance, but I don't see the matching gift company in Salesforce. What's wrong?
A: There are a few troubleshooting steps that you can try, in the following order:
- If you receive an error message indicating that you do not have the most recent version of the Double the Donation Matching App, follow the prompts to install the latest version. This functionality is only available for Version 1.1.0 and above.
- You must add the Company Selected for Matching Gifts field manually to the layout of the object you use to store donation data. By default, the Company Selected for Matching Gifts field is only available for the Opportunity and Contacts objects. Follow all the instructions in the "Step-by-Step: Sync Matching Gift Data from Double the Donation Matching to Salesforce" section of this guide to ensure that you have successfully added the field to your layout.
- This functionality requires your organization to have configured "My Domain." Follow the setup steps in this Salesforce guide to set up My Domain, which will automatically enable lightning web components (required for this functionality).
Q: When I pull reports in bulk, how does my two-way sync appear?
A: Currently, the DTD's custom object stores the company name and the company ID. This means you can generate reports in Salesforce based on those two fields, in addition to viewing all of the company details on the individual Contact and Gift records.
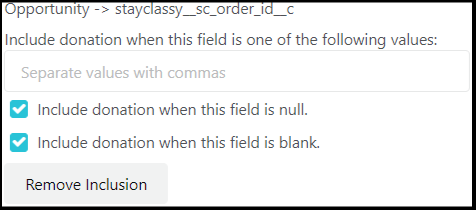
Q: I integrate with Salesforce and Classy. How can I prevent Classy donations from being duplicated in Double the Donation Matching?
A: In most cases, you can prevent duplicate records from being imported into Double the Donation Matching by setting a limit for duplicate donations. Learn more here. On rare occasions, some duplicate donations will not be caught by this limit because the primary email address pulled in from Salesforce may differ from the one the donor used when they donated via Classy. In these cases, you can configure a Salesforce inclusion so only non-Classy records are imported from Salesforce. Following the instructions here, set an inclusion for the Classy Transaction ID and check the two boxes that appear below. The following inclusion should then be visible in your matching module:
Q: For the import criteria, what timestamp does Double the Donation Matching use to pull in donations?
A: Double the Donation Matching uses the Close Date of the gift as the import criteria date.
Q: How often does Salesforce sync data to Double the Donation? Can I edit this sync window?
A: The data sync between Double the Donation Matching and Salesforce runs every 2 hours on a continuous schedule. This schedule is optimized to be highly efficient for your organization, taking less than 1 minute to complete! A vast majority of Double the Donation Matching clients find this sync schedule to be perfect for their use case.
In some rare cases, a Double the Donation client organization might want to limit the time window in which Salesforce syncs data to Double the Donation Matching. After speaking with your Double the Donation Client Success team about this option, you can configure a sync window by navigating to your Salesforce integration "Sync Options" section.

Note that the sync window must allow a minimum of 6 hours each week to sync data between Double the Donation Matching and Salesforce. This minimum sync window ensures that there is enough time for the sync to run without disrupting either system's operations.
Q: Can I modify the "Company Selected for Matching Gifts" in Salesforce?
A: You cannot edit the text of this field in Salesforce, because it is automatically generated from Double the Donation. For example, you cannot add a company as freeform text if the field is empty in Salesforce. However, you can update the corresponding field for the donor in the matching module, which can then update the Salesforce record.
Q: What information passes from Double the Donation Matching to Salesforce in the 2-way data sync?
A: Double the Donation will update the Matching Gift and Matching Gift Status in Salesforce when using the default integration mapping for NPSP. The company name and associated matching gift status will appear on the record preview. If no company has been selected, the field will remain blank in Salesforce. The table below explains how each Double the Donation status will appear in your Salesforce instance:
| Status in Double the Donation Matching | Status in Salesforce |
| Waiting for Donor | Potential |
| Matching Initiated OR Pending Payment | Submitted |
| Match Complete | Received |
Q: Why do donation records appear to be one day behind?
A: The timestamps on the gifts are missing time zones, so they are processed using the standard GMT time zone by default. Learn more here.
Q: If I'm using another platform with Salesforce, what should I do to make sure I don't end up with duplicate donations in Double the Donation Matching?
A: This is a common combination of integrations! Double the Donation Matching is well-suited to help you manage this configuration. We recommend reviewing this article for best practices in managing multiple integrations. Specifically, we recommend activating the Duplicate Donations exclusion rule for multiple integrations, which you can learn more about here.
Q: Can I preview which records will flow into Double the Donation Matching from Salesforce based on my current integration settings?
A: Yes! You can preview records as they would appear in Double the Donation with the settings you have configured by navigating to Integrations --> Manage --> Preview Records. The records will appear as either Imported, Will Be Imported, or Will Not Import. These are defined below:
- Imported: Record already exists in Double the Donation and is not impacted by setting changes.
- Will Be Imported: Record meets all criteria set for the integration and will be processed in the next sync.
- Will Not Import: Record does not meet the current criteria for the integration and will not be processed in the next sync.
Q: Where can I embed Double the Donation's plugin?
A: We recommend creating a dedicated matching gift page on your website. This page will help all website visitors, not just those on your donation form, understand matching gift programs and easily find their company’s matching gift guidelines and forms.
To embed the matching gift search tool, locate your embed code from your matching module. Full instructions are available here.

Q: Where can I learn more about the Double the Donation Matching and Salesforce integration?
A: Navigate to our partner landing page to learn how Double the Donation Matching and Salesforce can increase your matching gift revenue!
Q: What types of workplace giving programs does Double the Donation support?
A: Yes. Double the Donation helps nonprofits and schools maximize workplace giving by supporting a range of employer-sponsored programs, including:
- Matching gifts
- Volunteer grants and paid volunteer time off (VTO)
- Payroll giving
- Corporate sponsorship opportunities
To learn more:
- Current clients can visit our Knowledge Base or connect directly with our Support team to explore how to make the most of our full suite of products.
- To see how our partnerships and integrations help organizations unlock more workplace giving, check out our workplace giving integrations page.
Training Video