Instructions for specific DNS servers
Training Video: CNAME Information
Why DNS Setup Matters
Inbox providers such as Gmail, Yahoo, Outlook, and Hotmail use DNS authentication to determine whether an email is legitimate. Without DNS records in place:
-
Emails may be flagged as suspicious
-
Deliverability may decline
-
Messages may land in spam folders
By adding CNAME and DMARC records to your DNS, you authorize Double the Donation to send email on behalf of your domain.
Before You Begin
What You Need
-
Access to your DNS hosting provider (e.g., GoDaddy, Bluehost, Cloudflare)
-
Access to your Double the Donation account
-
Ideally, a member of your IT team added as a user
Recommended Workflow
Use two browser windows:
-
DNS provider tab
-
Double the Donation tab
If You Don’t Know Who Manages Your DNS
Contact the team that manages your website or organizational email.
Instructions for specific DNS servers
Your DNS provider may have unique formatting rules. If your provider is listed below, follow its specific guide:
- GoDaddy
- 1&1 Web Hosting (1and1.com)
- BlueHost
- Cloudflare
- cPanel control panel (HostGator, JustHost, WebhostingPad)
- DreamHost
- Google Domains
- Hover
- MediaTemple
- Microsoft Azure
- NameCheap
- Network Solutions
General CNAME Setup Process
The steps below apply to nearly all DNS providers.
1. Navigate to your DNS provider’s advanced DNS settings. Look for the option to add CNAME records.

Please note: each DNS provider has a unique layout and interface. These instructions give a general overview of the steps to take within your DNS provider; however, the navigation and steps may be slightly different.
2. In the second browser tab, log in to Double the Donation.
If you are sending emails from multiple Double the Donation modules, the following steps only need to be completed once. These records can be accessed from any module by navigating to Email Customization --> Sending.
3. Navigate to: Email Customization → Sending
4. Under Step 1 in the Sending tab, type the full email address you want emails sent from (e.g., matching@yourorg.org) and press Enter.
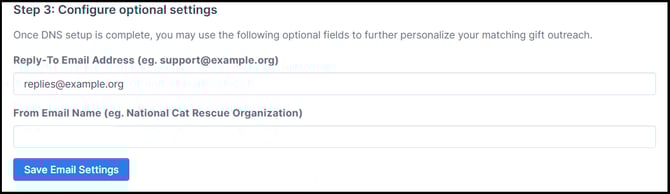
Optional: Reply-To Email Address
You may enter a different Reply-To Email Address under Step 3. Click Save Email Settings.
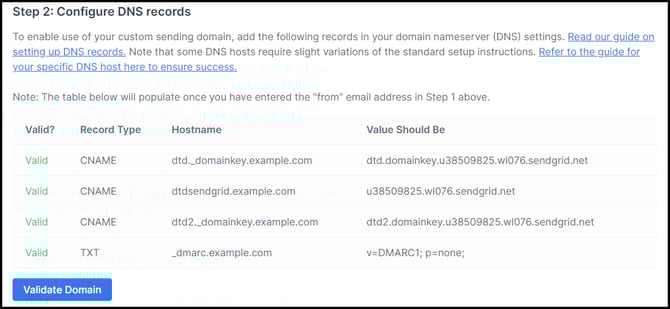
5. After entering your From Address, three CNAME records appear in Double the Donation.
For each record:
-
Copy the Hostname
-
Paste it into the Host/Name/Alias field in your DNS provider
-
Copy the Value Should Be
-
Paste it into the Points To / Value field

6. Switch back to Double the Donation browser tab. For the same record, copy the value in the Value Should Be column. Back in your DNS browser window, to paste into the corresponding field in your DNS provider account.
7. Complete these steps for all three CNAME records in your Double the Donation account, then save your changes in your DNS provider account. Here's what the table will look like once all three CNAME records have validated:
Stay logged in to your DNS provider and Double the Donation account for the next set of instructions.
If your DNS records are set up correctly, you'll see a Valid message letting you know your email-sending domain is verified. Please be aware that it can take up to 24-48 hours for changes made with your DNS provider to be reflected in your Double the Donation account.
General DMARC Setup Process
DMARC (TXT Record) provides additional validation and improves inbox performance.
Check for Existing DMARC Record
-
In your DNS Settings, review the list of records already added.
If a DMARC TXT record already exists, you’re done! Double the Donation will automatically identify the DMARC record, and you can skip to validation.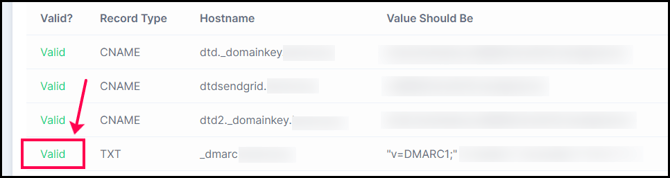
-
If No DMARC TXT Record Exists
Proceed with the following steps to add a DMARC TXT record.
Adding a DMARC TXT Record
1. In the example below, all DNS record types are displayed together. Your DNS provider may show each record type (A, CNAME, TXT, etc.) in a separate section; if this is the case, find the section for TXT / DMARC records. Add a new record by clicking Add (Add Record, Create new record, etc).

Please note: each DNS provider has a unique layout and interface. These instructions give a general overview of the steps to take within your DNS provider; however, the navigation and steps may be slightly different.
2. In the DNS Setup Table in your Double the Donation account, there is 1 TXT record. Copy the value from the Hostname column, switch to the browser tab containing your DNS settings, and paste it into the corresponding field in your DNS provider account. Some DNS providers will refer to Hostnames as Aliases.

3. Switch back to the Double the Donation browser tab. For the same TXT record, copy the value in the Value Should Be column. Back in your DNS browser window, to paste into the corresponding field in your DNS provider account.
Please note: The sample value provided for your DMARC TXT record is very simple. Your IT team may want to modify it slightly. This value is sufficient for the purposes of sending Double the Donation emails through both of the modules.
4. Save your changes in your DNS provider account.
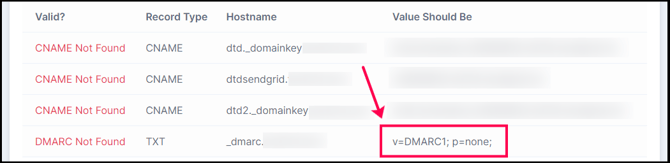
Troubleshooting DNS records
If your DNS records have not propagated or are still showing a CNAME Not Found error, try the following:
-
Wait 24-48 hours for propagation.
-
Ensure all records are added: If only some records are valid, check that all three CNAME records are present.
-
Check for typos: Ensure that CNAME records are copied and pasted directly from your Double the Donation account to avoid errors. Avoid manually typing from screenshots, which can lead to typos.
-
Correct Domain: Ensure CNAMEs are added to the correct domain (e.g., if your Double the Donation account uses matchinggifts@catrescueclub.org, the CNAME should not be added to the catrescueclub.com domain).
- Refer to the instructions provided by your individual DNS service. Instructions for service providers such as GoDaddy, Network Solutions, and DigitalOcean require Hostnames/Aliases to be entered without your organization’s domain included (for example dtd._domainkey.catrescueclub.org will be entered as dtd._domainkey for these providers).
- If you use a custom nameserver, in place of the default nameserver of your provider, your CNAME records need to be entered into the account associated with the custom nameserver.
If these scenarios do not apply to your DNS records, please reach out to support@doublethedonation.com to troubleshoot to find a solution.
FAQs
Q: Will additional records (ex: SPF/DKIM) need to be added to our domain?
A: To set up Double the Donation, only the CNAME and DMARC records provided within your account are needed to configure email sending. No additional steps are necessary for email authentication.
Training Video: CNAME Information